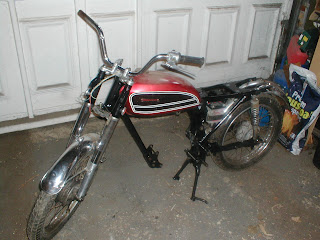
Just a quick post - no photo yet. I tried to start the CG125 today but it didn't seem to want to fire. The bike had a strong spark at the HT lead and seemed to have a good spark at plug. Fuel was also there. The timing seemed to be out though as it backfired once or twice. When I checked the timing I couldn't understand why I wasn't able to get the points anywhere near opening when the timing marks lined up. They would only line up when the rockers were pushing on the valves - i.e no compression. After a bit of head scratching I realised that under the flywheel magneto assembly there is an advance retard system which had been put on the wrong way round, which meant the timing was 180 degrees out. It could never have fired up properly, this was possibly why the engine was not in use when I bought it. I'll post a photo of the advance retard system when I take the flywheel off again to give it a good clean. After putting the advance retard system in correctly and sticking in a spark plug from the CD90Z (the CG125 one didn't seem to be allowing a strong enough spark to run), the bike fired up and ran. It now needs the proper plug fitting and timing and valves fine tuned. To get a video of it running it also needs an exhaust! Still lots of bits missing but it is very encouraging to have the engine going.
Sunday, 10 June 2012
Tuesday, 5 June 2012
CG125 - fitting the engine,oilchange
 Fitted the engine that looks most likely to run. Changed the oil, jury rigged the ignition and got a spark. I put a bit of fuel in the carb float - the engine fired but didn't run. A bad misfire as if the timing is way out. Next thing I'll have to do is investigate why. Pleased I've got a good spark though. I took off the valve cover and was impressed at how clean the valve gear looked.
Sunday, 3 June 2012
CG125 - Forks. wheels, stand and handlebars
More bits loosely fitted, but at least it looks more like a motorbike. The stand will need a new spring as it doesn't stay up properly and I may need to renew the steering head bearings. The tank I believe is from a CB125 but looks though it may fit. Lots of small bits are missing as I suspected. I am intending to do an initial fit to see what's missing and to check if I can get the engine to run. I shall probably make a single seat.

CG125 - Topcoat on and dried
Here's my kit of black painted parts ready to start assembly. Bit of a dry run as I need to get some shiny new bolts.
Friday, 1 June 2012
CG125 - rustproofing and undercoating frame and air filter
After the new Rustblast arrived I finished rustproofing and undercoating the remaining bits. Frame and air filter after Rustblast is applied, left and then washed off. The Rustblast apparently etches the surface too. Looks quite good, especially after the primer is painted on. I applied it with a brush but it still levelled out nicely. I am hoping to spray on the top coats tomorrow, more on the blog if I do.
Saturday, 26 May 2012
CG125 - preparation for printing
Having removed the paint I used KBS Aquaclean and Rustblaster and sandpaper/wire brush to get the bits to a state where they are ready for painting. Ran out of Rustblaster so still got to do the frame once I've bought some more.
First parts prepped, all in pretty good condition. Still got to de-rust the air filter box which is one of the original metal ones.
CG125 - paint removal
It's been a while but I stripped off the paint from the CG125 frame , swinging arm and bits and pieces. I was going to have it blasted but in actual fact the paint came off fairly easily.

The frame seems very solid, welds secure and no sign off any distortion.
Saturday, 18 February 2012
CG125 crankcase cover
It's about time I posted again. I bought a crankcase cover off ebay, a bit mucky and scratched but it is around 40 years old. Still after a bit of wet and dry with washing up liquid and lots of water followed by some paint stripper with wire wool it was beginning to look a little better. I then finished up with some aluminium polish which improved the look of the case considerably.
A bit of black paint round the Honda logo should finish off nicely.
The frame is now stripped and rather than strip it with paint stripper etc as I did with the CD90Z I intend to get it blasted. I have had a problem with the stand which is rusted onto the shaft, it will not shift with heat or penetrating oil and unfortunately I'll have to cut it off. I am gradually collecting some of the missing parts but have a long way to go. More on that later...
Subscribe to:
Comments (Atom)


